Turn 1
The first activation goes to Rome and they use it to purchase 2 Galley squadrons, in Rome and Rhegium. Rome starts the game with a severe disadvantage at sea and Chris is trying to close the gap a bit.
The second AM is an Event, Stability & Revenue which affects no one.
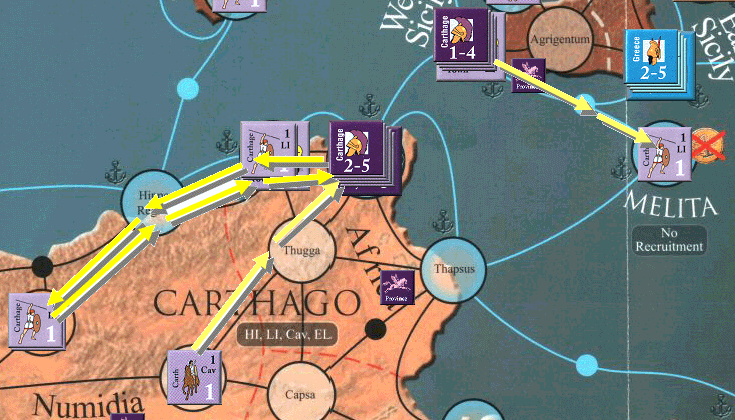
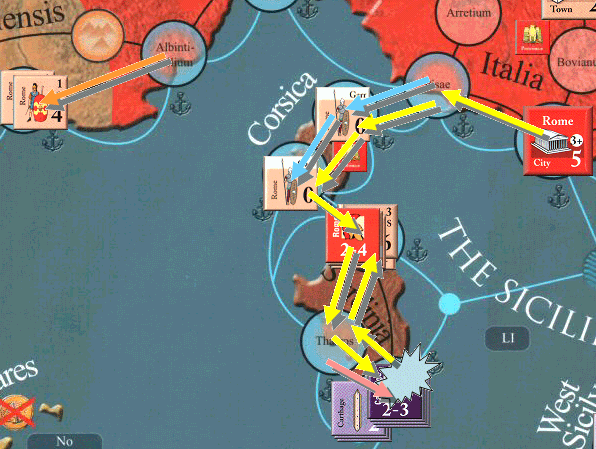
For Carthage's first activation, I decide to concentrate my forces. There's at least 2 outposts in Africa that I cannot see doing any good in their present positions: the 2LI in Cirta and the 1C in Thevastis. I also want to take Melita. It provides no income or units, but the extra stability and Geographic Objective Points should help me out.
So Carthage takes an expansion move to consolidate those forces in better locations.
- Major move: The 2-5 leader in Carthage, taking advantage of his campaign rating, gets just enough movement points to move along the coast, pick up the 2 LI units from the mountain fortress of Cirta and return to Carthage.
- Minor move 1: The 1C in Thevastis moves by itself the two spaces to Carthage, to join the 2-5 leader and the majority of Carthaginian forces there.
- Minor Move 2: The LI in Lilybaeum moves to Melita.
 Rome is next up and also makes an expansion move.
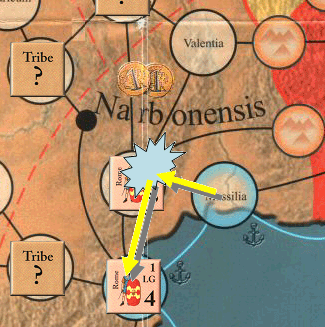
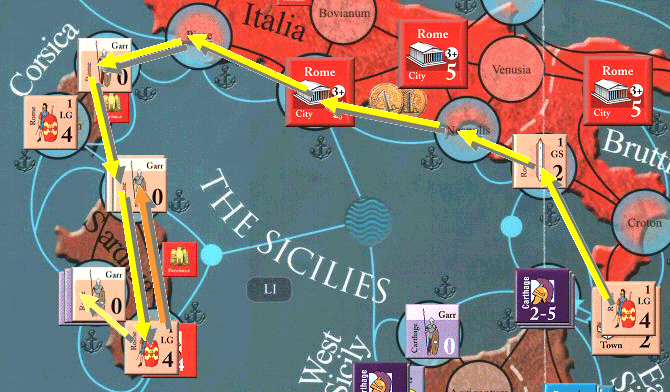
- Major Move: The 1-4 leader in Rhegium attacks the Mamertines across the straits into Massena. The Romans succeed in reducing the Mamertines, but do not have enough movement points left to force a retreat or attack again.
- Minor Move 1: One of the two legions in Arretium invades Corsica, eliminating the Carthaginian Garrison at Aleria before settling in Urcinium.
- Minor Move 2: The other legion in Arretium heads towards Spain, stopping in Massilia in Narbonensis.
 Carthage is up next. Stan's aggressive move into Corsica and his attempt to get into Siciliy is a surprise to me. I had planned to try to get my 2-5 leader into Spain and start expanding my empire, but that will have to wait.
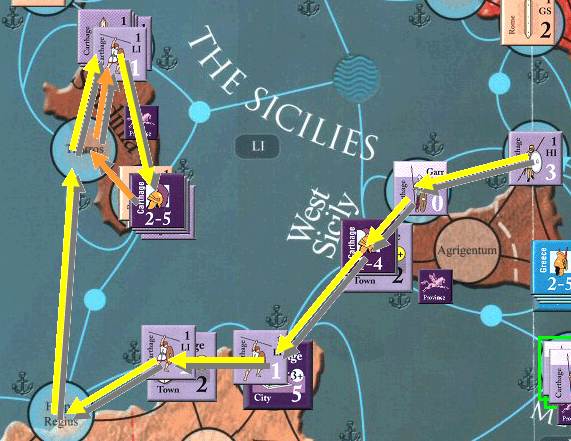
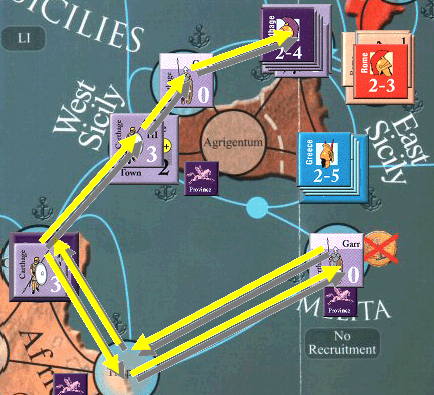
- Major Move: Activate the 2-5 leader along with 1HI and 1Cav and sail to Siciliy to finish of the Mamertines and occupy Massena, preventing an easy crossing by Rome into Sicily.
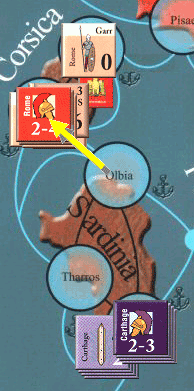
- Minor Move 1: Move a galley from Utica to Tharros in Sardinia in an attempt to forestall losing that province as well.
- Minor Move 2: Move a galley from Lilybaeum to Olbia in Sardinia for the same reason.
 Rome has the next activation and she isn't going to let a couple of galleys deter her from taking Sardinia.
- Major Move: The 1-4 leader in Rhegium is activated and leads a single legion and two Galleys up the coast of Italy. One Galley is left behind in Baetum to force a Carthaginian crossing from Massena through Rhegium. Another galley and another legion are picked up in Rome and the assembled force sails for Sardinia. Outnumbered, the Carthaginian galleys at Olbia give way while Rome overruns the island and a legion is broken up into Garrison units.
- Minor Move 1: Garrison to Aleria.
- Minor Move 2: Garrison to Tharros.
 (Note: Neither of us is clear what happens to the Galleys when the land space is taken, we just decided that they remained there offshore until they moved or were eliminated from attrition. This may have been a rules mistake.)
The situation for Carthage is pretty bad. An attempt to take Sardinia back will be very risky. But if I don't try now, I'll never get it back and Rome's lead in money will become acute. So I decide to make the risky move and attack Sardinia.
- Major Move: The 2-5 leader leaves 1HI in Masena and sails back to Carthage with 1Cav, where he gathers up 1HI, 1Cav, 1LI, and a Galley. Pick up a 2nd galley in Utica and the two other Galleys in Tharros enroute to Olbia, passing a transit point and two unfriendly ports in the process (lucky!). The Roman Galleys retreat to Caralis rather than fight and the Carthaginians storm ashore at Olbia, sweeping aside the Garrison. They then move on to Caralis, where the Roman attempt to retreat is thwarted by the Carthaginian cavalry and the Roman army wiped out.
- Minor Move 1: LI from Caralis defeats the Roman garrison at Tharros and ends up in Olbia with the Carthaginian Fleet. (Note: This turned out to be illegal and instead the 1-4 leader was moved to Massena.)
- Minor Move 2: The LI in Melita breaks down into Garrison units.
 The next AM is an event, Galley technology, which benefits Carthage whose final AM comes out next.
Carthage is forced to make another expansion move because everything in Sardinia is without an LOC unless we can move off the Roman galleys in Caralis. Luckily Galley technology will make this more easy.
- Minor Move 1: LI from Caralis is unable to move far enough to defeat the Roman garrison at Tharros so moves to Olbia instead
- Minor Move 2: HI from Caralis to Tharros, defeating the garrison and stays there to insure that the galleys do not have to make a continuation roll.
- Major Move: 3 Galleys move from Olbia to Caralis via Tharros. The Romans will be able to withdraw, but they will be forced through 2 naval transit points, including a Deep Sea transit point. Otherwise they will have to fight a battle at 9BP:4BP. Or so I thought...on closer inspection, they can retreat into the same space I entered from, so the Roman galleys withdraw to Aleria, passing the continuation roll at Tharros.
 Rome has the final AM of the first turn.
- Minor Move 1: The Roman legion in Massilia attacks the tribe in Nemausus (5BP strength). Luckily for Rome, it's a relatively bloodless battle. The tribe loses 1BP while Rome loses none.
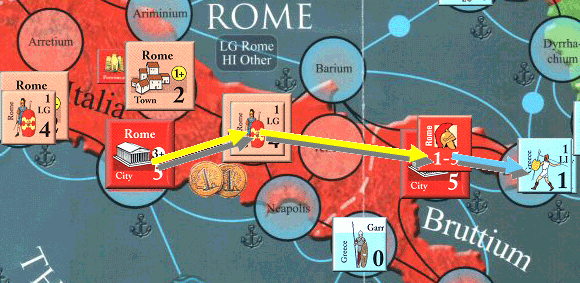
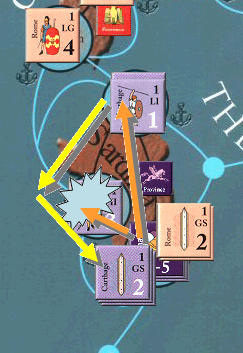
- Major Move: Activate the 1-4 leader in Arretium. he moves to Corsica, picks up the Legion and Galleys there and moves to Olbia. Faced with a naval battle at only a -2 (4BP+leader vs. 3BP), the Carthaginians stay to fight, but lose the ensuing naval battle, although they take a Roman galley with them. The Carthage LI retreats to Caralis while the legion ends it's turn in Olbia.
- Minor Move 2: Galley in Paestum to Rhegium.
 End of turn status:
- CVP: Carthage- 5 (1 City, 2 towns), Rome - 12 (3 cities, 3 towns)
- GOP: Carthage: 8, Rome 4
- VP: Carthage +2 (GOP) to 2, Rome +1 (CVP) to 1.
- Stability: Carthage - 6 (+1 for VP), Rome - 6 (-1 for VP)
- No problems with the number of HI or LG compared to Stability or CVP for either side.
- Income: Carthage - 13T, Rome - 18T
Turn 2
Start of turn actions:
- Carthage maintains 4 Galleys
- Rome maintains 2 Galleys
- Carthage builds 2HI in Carthage
- 1 LI in Urcinium, 1 LG in Albintimiltium, 1 LG in Rhegium, 2 LG and 3 galleys in Rome
- Carthage places 2-4 leader in Carthage and 2-3 leader in Tharros
- Rome places 2-4 leader in Rome and 2-3 leader in Rhegium
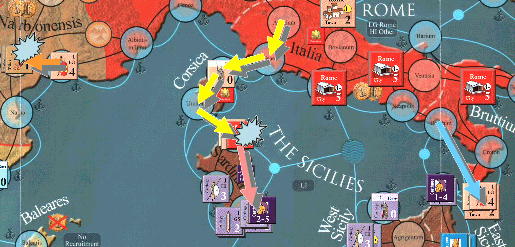
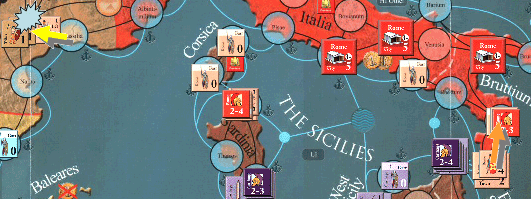
- Major Move: the 2-4 leader in Rome crosses to Sardinia with 2LG and 2 Galleys. They move to Tharros, but the Carthaginians retreat to Caralis. Rome pursues them and a battle ensues in Caralis. The odds are fairly even, and Rome loses the battle, suffering 6BP worth of losses to 1BP for Carthage. The Romans retreat back to Olbia to lick their wounds. Sardinia is now neutral as a result, however.
- Minor Move 1: The garrison in Pisae moves to Urcinium.
- Minor Move 2: The LG in Albintimiltium moves to Massilia.
 Carthage has the second AM and also performs an expansion move.
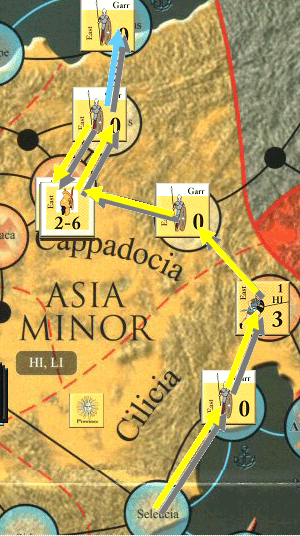
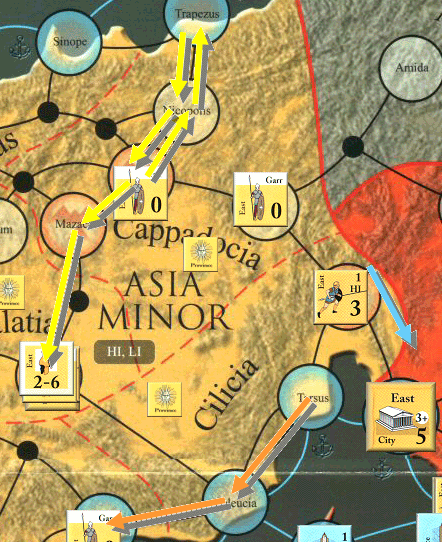
- Major Move: Fearful of the 2LG staring across the straits at Messana, the 2-4 leader in Carthage is activated, along with an HI, LI and Galley. They move to Melita, where they grab one of the Garrison units there. The entire force then moves to Messana to joing the HI already there.
- Minor Move 1: Build a town in Messana.
- Minor Move 2: The LI in Gades (Hispania) is broken down into 2 garrison units.
 The third AM is an Event, and Greece is rolled. It will cost 1T to activate Greece, so Carthage pays 1T (down to 4T now!) in order to give Rome something else to worry about.
The fourth AM is an Event and Stability is rolled. Rome's AM comes out next, so Stability affects Rome. However, with her stability at +6, there is no effect.
Rome now gets to play her second AM, making an expansion move.
- Major Move: The leaderless 2LG in Massilia attack the 4BP remaining of the tribe in Nemausus. The Romans suffer a setback in the battle, taking 4BP of losses, while the tribe takes just 2.
- Minor Move 1: The 2-3 leader in Rhegium moves to Croton.
- Minor Move 2: The LG in Rhegium moves to Croton.
 Carthage has the next AM (her second) and performs an expansion move.
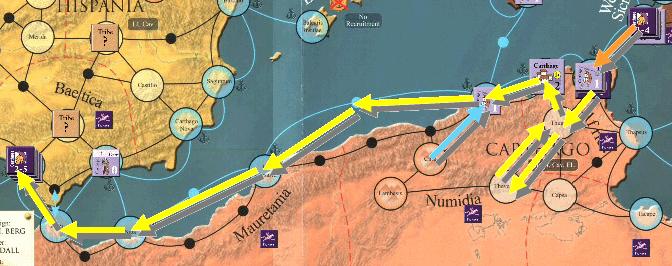
- Minor Move 1: The Garrison in Gades moves to Carthago Novo.
- Minor Move 2: The Galley in Massena moves to Caralis.
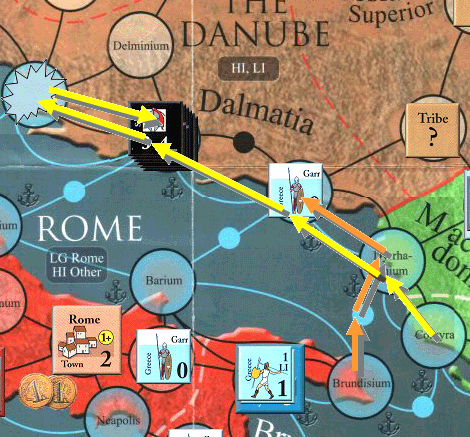
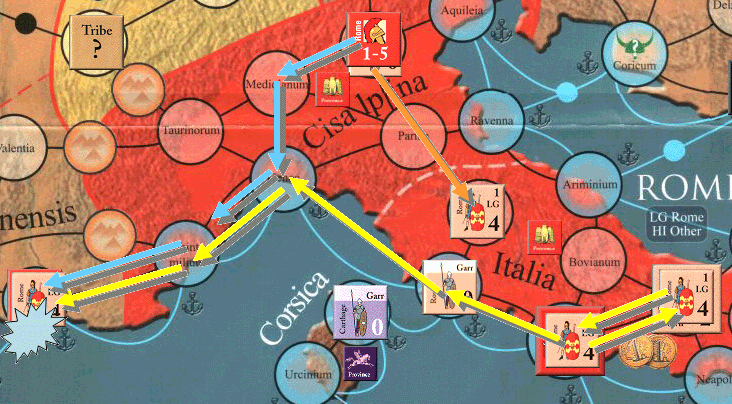
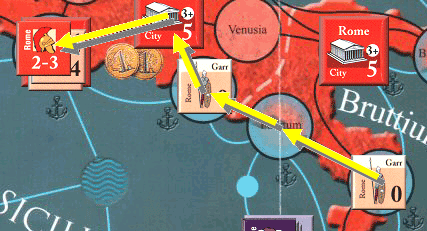
- Major Move: The Greek 2-4 leader and his force (4HI 1Cav) are activated. They embark galleys at Dyrrhacum and sail up the coast of Italy to Armunium, where the town forces them to stop and debark for battle. The Greeks overwhelm the town and then destroy it before moving inland to destroy the Roman Garrison in Parma.
 Rome draws the next AM and also performs and expansion move.
- Minor Move 1: LG in Gaul activates, but is not able to get enough movement points to attack.
- Major Move: The 2-3 leader activates and rushes to defend Rome.
- Minor Move 2: Passed.
 Rome draws the next AM and makes yet another expansion move.
- Major Move: The 2-4 leader activates and leads his forces off Sardinia to Urcimium on Corsica.
- Minor Move 1: The LG in Gaul activates again and is once again unable to muster enough MP to attck.
- Minor Move 2: Passed.
 Carthage has the last 2 AMs. The first is used for expansion.
- Minor Move 1: The Garrison in Panormus moves to Lilybaeum.
- Minor Move 2: The Garrison in Carthago Novo moves to Barcino.
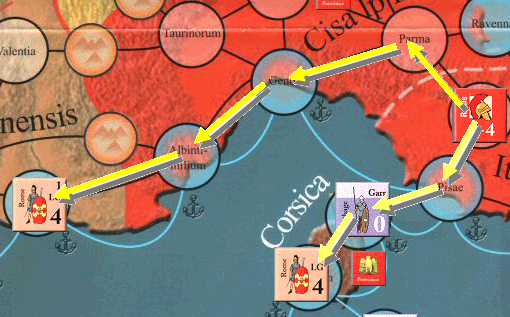
- Major Move: The Greek leader activates, attacking and destroying the Roman town at Placentia before settling in Pisae, blocking lines of communication with Corsica.
 With the last AM, Carthage makes another expansion move:
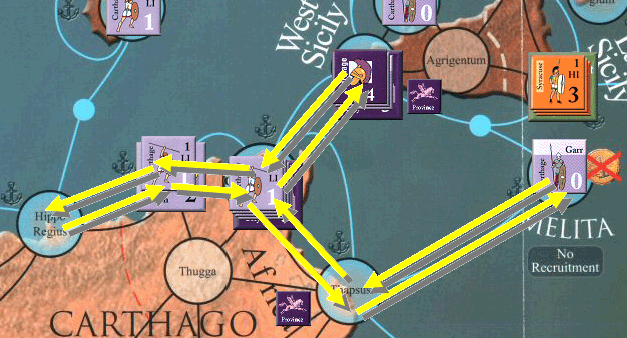
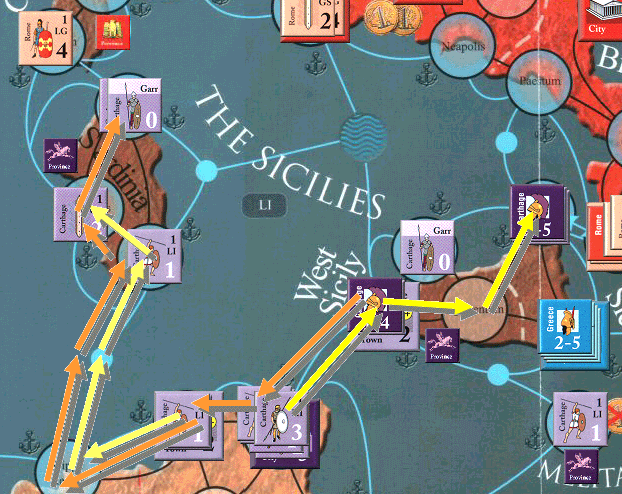
- Major Move: The 2-4 leader in Massena activates, making a naval move which picks up the Garrison in Lilybaeum and debarks in Tharros, returning Sardinia to Carthage control.
- Minor Move 1: The Garrison in Barcino is finally abe to get enough MP to board ships and sail to Balearis Insulae, taking control of the Balearic Islands.
- Minor Move 2: The Greek Galley attempts to make it back to friendly waters, but is only able to get as far as Brundisium. It will be lost during the attrition phase.
 Attrition: Rome loses an LI in Urcinum, which is cut off from the mainland by the Greek army in Pisae.
End of turn status:
- CVP: Carthage- 6 (1 City, 3 towns), Rome - 10 (3 cities, 1 towns)
- GOP: Carthage: 9, Rome 4
- VP: Carthage +2 (GOP) to 4, Rome +1 (CVP) to 2.
- Stability: Carthage - 8 (+1 for VP, Baleares Islands), Rome - 5 (-1 for VP)
- No problems with the number of HI or LG compared to Stability or CVP for either side.
- Income: Carthage - 13T, Rome - 14T
Turn 3
Start of turn actions:
- Carthage maintains 4 Galleys
- Rome maintains 3 Galleys
- Carthage places 1-5 leader in Carthage and 1-4 leader in Caralis
- Rome places 1-4 leader and 1-3 leader in Rome
- Carthage builds HI in Carthage, LI in Caralis, Cav in Carthage
- Rome builds 5LG in Rome
Conclusion
Turn 1 was interesting and see-saw and both Stan and I felt we were losing when it ended. Turn 2 was a bloodbath for Rome, from the early battle at Caralis where cavalry made the difference to the appearance of the Greeks, to the mis-adventures in Gaul. Luck abandoned Stan on Turn 2, and never came back, making a victory fairly impossible, since he is forced to overturn a large GOP defecit and hadn't made progress on Turn 2.
Only more playing will tell whether this was an atypical result or not, as I have heard this scenario is finely balanced. Given the one-sided luck on Turn 2, I don't draw any serious conclusions.