Thursday, January 26, 2006

For the People - (Last Full Measure)

Spring 1861

A tentative opening from both sides.

The Union places a fort in Harper's Ferry, moves the AoP to Frederick, while putting an SP in Baltimore to protect our supply line to DC, adds PCs in Tennessee (Pro Union Secessionist in Tennessee) and ups the AA modifier by 2.

The CSA adds 3SPs, places two PCs in Kentucky, and forces Union SW down by 5 (Stop the War).

Summer 1861

The Union continues to lay the groundwork for future action by securing its borders. A fort is placed in Frederick, and a new (and mis-named) Army of the Missouri is created in DC, under the command of McLellan. This Army will not be used for offensive purposes, but with McLellan's defensive modifier, they have a decent chance to make some intercepts and cause some casualties. Plus, the two armies will help protect the Union against politically-motivated rash movements towards Richmond.

The CSA revel in Draft Riots, which sap Union strength and continue to place PCs in Kentucky.

In the first offensive action of the war, Pope and Burnside, commanding 6CUs in Cairo, attack Columbus, KY. The CSA does the better fighting, but the garrison is overwhelmed all the same, due to numerical superiority, and the fort in Columbus is destroyed.

The Union also tightens its blockade, while the CSA places a fort in Manassas to guard the approaches to Richmond.

The USA launches a Minor Offensive. Rosecrans sails from Cincinatti and takes the fort at Dover while Banks advances with 3SP to restore order in Kentucky. Mud hampers his march, however, and his effort is less than successful, though enough to prevent Kentucky joining the CSA.

Strategic Will
USA: 98+
CSA: 95-

Blockade: 1
AA: 2

Fall 1861

Contraband of War enables the Union to remove SPs from Manassas and Nashville, forestalling CSA plans to create armies in those spaces (by dropping them to 4SP). The CSA uses what leverage it can gain from cotton to add SPs to its own effort.

Baltimore Revolts is in the Union hand, so the 1SP from Baltimore joins the AoM in preparation for an AA against Forts St Phillip/Jackson lead by Admiral Foote. The assault ends successfully with 2 Union SPs in the coastal fort. With the Mississippi vulnerable, the CSA places torpedos at key points. But it is not sufficient to prevent the Union from gaining control of the Mississippi and cutting the CSA in half.

While the CSA continue to move SP to more strategic locations, the Union tightens the blockade even further.

The CSA send Pemberton with a small force into Kentucky, as far as Lebanon, to attempt to bring the state into the CSA fold. The Union responds by attacking the remaining forces in Nashville, cutting Pemberton off from supply, in an attempt to thwart his efforts.


Strategic Will
USA: 97+
CSA: 80-

Blockade: 2
AA: 2

Spring 1862

After a winter of training and wheedling by Lincoln to "do something", McDowell starts 1862 by attacking Manassas with the AoP (we're unlikely to win, but attrition will diminish the starting SP in the AoNV, and Lee is there but not yet a commanding general, so maybe we get lucky and kill him). The forts, however, prove too daunting a task and the AoP fails in its assault.

On the CSA side, having distinguished himself at Manassas, Lee forms the force into the Army of Northern Virginia. On the Union side, despite the loss, a group of soldiers from Wisconsin distinguish themselves and are dubbed "The Iron Brigade".

Burnside gathers up the scattered Union forces in Northern Tennessee and prepares to form an Army of his own, the Army of Tennessee. While he is busy with logistics, Burnside leaves Nashville unoccupied, enabling Wheeler's cavalry brigade to return to town and reassure the population. Meanwhile Johnston moves to Clinton, TN to quell the Union sympathizers there and re-open supply lines into Kentucky.

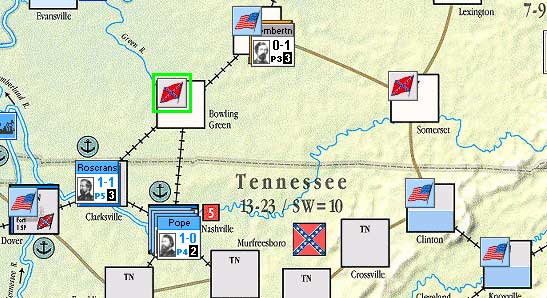
Faced with a newly supplied Pemberton, Burnside wastes no time advancing his Army to Lebanon to attack Pemberton. Once again, the CSA gives better than they get, but are numerically unable to forestall the AoT which brings Bowling Green, Lebanon, and Somerset back under Union control.

Burns, however, fails to protect his supply lines, which become Wheeler's next target as he moves his cavalry to Dover. At the same time, Johnston and Polk bring their forces together at Tullahoma, where Johnston forms the Army of Tennessee to oppose Burnside.

Union forces occupy Louisville, which will re-open Burn's supply lines and will be enough to insure that Kentucky gets the message and joins the Union.

In the East, McLellan dispatches two amphibious forces from his army in a joint operation against the CSA Fort Pulaski and Fort Gadsen. Both assaults are successful, further tighetning the Union grip on CSA shipping.

Strategic Will
USA: 106+
CSA: 70-

Blockade: 2
AA: 2

Summer 1862

With Jackson and Longstreet now capable of marauding around the map, the Union fortifies Pittsburgh to hamper CSA raiding. With Kentucky now in the Union fold, and with the CSA unable to cross the rivers from Kentucky, Burnside moves the AoT's base of operations to McKenzie. From here he threatens Memphis and can fight the CSA AoT.

In the Eastern Theatre, McDowell takes his AoP to Winchester and Strasburg in an attempt to catch Johnson before his force can join the AoNV. But Johnson proves far too wily, and retreats in good order through Strasburg and finally into the forts at Manassas. Needless to say, Lincoln is not pleased with McDowell allowing him to slip away without a fight.

His displeasure is increased when the newly-strengthened AoNV leaves Manassas to attack the AoP. Luckily for McDowell, the result is fairly inconclusive, although he is driven back to Winchester.

After a brief rest in McKenzie, Burnside gets his forces moving again, striking out at Van Dorn, who is defending Memphis. The result is never in doubt.

McLellan, itching for action in DC complains loudly that dysentery is cripping his inactive forces. Lincoln is unmoved. Meanwhile, Union successes begin to convince the good folks of Missouri that the Union cause is just...or at least likely to prevail. Pro-Union rallies occur in Greenville, MO.

Spurred into action, the CSA launches a series of actions across the map. J Johnson leaves the AoNV and returns to handle the defenses at Manassas. A division moves from Weldon to Richmond to increase defense of the capital. And Johnston leads his AoT overland to attack Burnside and his AoT.

The two massive armies clash at Memphis and the CSA proves too difficult for the Union, which retreats with heavy losses to Humboldt. The CSA also suffers heavily, though they have better facilities at Memphis in which to recover.

McLellan continues to complain loudly that the Union's best general is being left to rot, so Lincoln assigns him the task of organizing another series of Amphibious Assaults, this time against Columbus, GA and Fort Sumter. The force lands unopposed at Columbus, but the assault on Fort Sumter is turned back.

Lee, having secured his lines of communications, strikes the AoP at Winchester. The AoP offers stiff resistance, however, and Lee is forced to retreat.

Strategic Will
USA: 103+
CSA: 65-

Blockade: 2
AA: 2

Fall 1862

Having failed to take Fort Sumter on his own, Lincoln decides to assign Admiral Farragut to assist McLellan. Farragut's brilliant plan not only takes Fort Sumter, but also lands Pope and a small force in the port of Charleston as well.

CSA General Thomas "Stonewall" Jackson attacks Joe Hooker in Columbus, GA where he is threating to form an Army. Hooker manages to hold the city briefly, however a follow-up attack forces him to evacuate the city and return to DC.

Despite the minor setback, the Union effort is bolstered by the response to a call for volunteers and by more pro-Union rallies in Missouri, this time in Rolla. Even the sighting of another CSA Ironclad near Vicksburg can't dampen Union enthusiasm.

Burnside rouses the AoT from its camps in Humboldt and marches on Memphis, determined to re-take the city. Johnston proves too tough an opponent, however. At the height of the battle, CSA general Pemberton is killed leading the charge that sweeps the Union from the field. Johnston attempts to follow up by sending Morgan's cavalry to cut the AoT's supply, but Burnside intercepts Morgan, and his cavalry force is decimated.

Following on his success at Charleston, Pope's command is once again sent on an Amphibious Assault, this time to Sabine City, TX, where he lands successfully against light opposition.

General Jackson now leads his forces towards Kentucky, hoping to relieve pressure on Memphis. Unfortunately the degradation of CSA rail lines and supply problems which leave his men's haversacks empty hamper the march and he is only able to make it as far as Kingston.

Strategic Will
USA: 95-
CSA: 59-

Blockade: 2
AA: 2

Spring 1863

Pope's landing force in Sabine City is reinforced heavily and General U.S.Grant sent there to form the Army of the Cumberland, while Stonewall Jackson drives his force through the long winter until they reach Somerset by Spring.

Burnside moves his Army to Franklin, where he can keep an eye on Jackson, but maintain the threat to Memphis. Meanwhile, a small force under Van Dorn is shipped to Jackson, MS to keep an eye on Grant. He doesn't have to wait long for news, as Grant move his army forward aggressively, converting Shreveport into a supply base on the way before dispatching a small garrison defending Monroe.

Lincoln seizes on the Battle of Monroe, which seemed only a minor victory at the time, to make his Emancipation Proclamation.

Burnside, keeping one eye on Jackson, begins to exert control over ever larger areas of Tennessee while moving towards eastern Tennessee where he can get himself astride Jackson's supply lines. Grant drives his small Army forward again, taking Jackson and Vicksburg from CSA garrisons.

Grant pauses just long enough to survey the situation. His relentless efforts have dwindled his forces, but he has eliminated all opposition that could threaten him through Vicksburg. He decides to strike out north, taking Little Rock from its tiny garrison and threatening Memphis from the West and East. Maybe he can succeed where Burnside failed during the Summer Campaign months?

Texas, after Grant's march from Sabine City, becomes the first CSA state to give up the cause.

Strategic Will
USA: 105+
CSA: 27-

Blockade: 2
AA: 2

Summer 1863

Grant's newly reinforced Army strikes northward from Little Rock to eliminate Price's small force, which has stayed on the Arkansas/Missouri border since the War's start. This secures his flank and converts areas of Arkansas to the Union side. His offensive ends in Little Rock, where it began.

AP Hill moves into the void left by Grant, moving his force from New Orleans to Vicksburg.

Convinced that Jackson's march is just a diversion and determined not to let Grant have the glory of taking Memphis, Burnside moves the AoT back towards Memphis, through Southern Tennessee, converting areas as he goes. When news of Burnside's departure reaches his camp in Somerset, Jackson moves further North, settling in Louisville.

A fierce battle rages behind the scenes over the objectives for Grant and Burnside, and when the dust settles, Lincoln commands Burnside to give up command of his precious cavalry regiment, in favor of sending it to join Grant who will assault Memphis. The CSA AoT will be pinned in Memphis by the threat of Grant and the cavalry-less Burnside is given leave to pursue Jackson in Kentucky. Complaining bitterly, Burnside nonetheless does as as ordered and advances to Lebanon, where Jacskon intercepts his force, and deals a blow to both the AoT and Burnside's pride, confirming for Lincoln that he chose the right man for the job of taking Memphis.

Surprisingly, however, Johnston moves the AoT away from Memphis, conceding it to Grant and marches forward to Paducah, KY. Grant, taking pains to leave enough force behind to convert Arkansas, takes Memphis without a fight, ending his march in Humboldt.

Back in DC, McLellan's incessant whining finally gets to Lincoln who orders him "Forward to Richmond". McLellan balks, saying he needs 6 months and 150,000 more men, but Lincoln is adamant. Unfortunately, the argument spills into public and Lee is alerted to McLellan's plans. He lays a trap for him in Manassas and pummels the AoM back to DC with heavy losses almost as soon as it starts its march. Even the loss of Johnson in the battle is not enough to sour the jubilation of victory, which culminates in recognition of the CSA by Brazil.

The jubilation, however, is short-lived. Grant moves his AoT from Humboldt, surrounds Johnston's AoT, and, after winning a narrow victory on the field of battle, destroys the Army utterly when it can find no path to retreat.

Lee, sensing a shift in the winds again, gathers forces from every available garrison and launches an attack against the AoP, dealing a second USA Army a serious blow in a single campaign!

It's a glorious victory and bouys the CSA spirits, at least until news arrives from the West that both Arkansas and Tennessee have left the Confederacy.

Strategic Will
USA: 90-
CSA: 7-

Blockade: 2
AA: 2


Fall 1863

With Tennessee, Arkansas, and Texas converted, Grant sets his sights on Mississippi, moving his force south through Panola to Granada. Forrest's cavalry brigade shadows him, to Memphis, threating to cut of his supply. Grant is undaunted and continues moving southward, where he catches up with AP Hill, destroying his force in Vicksburg.

The CSA hastily forms the Army of the West in Atlanta with AS Johnston back in command, despite his recent failures.

Grant continues to maraud through Mississippi, securing supply ports in Vicksburg and Grand Gulf, while the Army of the West marches north into Kentucky to join up with Jackson. Burnside, hoping to prevent them from joining forces against him, attacks Jackson, who is caught napping and loses his force. Emboldened, Burnside pushes forward and takes on the Army of the West at Somerset, but is forced to retreat to Lebanon when Johnston proves too tough for him.

Forrest moves to Panola, threating Grant's lines of communication once again, so Grant moves south, securing an alternate supply line through Mobile, before heading back into Mississippi to subdue the state, which eventually converts and drives CSA SW below 0.

Monday, January 23, 2006

We the People (Revoution IV)

Dennis and I switch sides, I am playing the Americans, Dennis is playing the British. Dennis takes no extra PC placements as the Brits.

1775

My goodness, what a bad starting hand: Operations -- 2. Operations -- 1, George Rogers Clark Launches A Western Offensive, Operations -- 2, John Simcoe Tory Rangers, Operations -- 1, Thaddeus Kosciuszko Engineer.

The game starts with PC placements. I try to hem him in in the northern New York area. He goes to work in Virginia with 3 PCs. The Americans respond by blocking placement from VA to the south, while the Brits continue to pile up PCs in the south, with 3 more.

I start discarding cards early, hoping to slow the PC race a bit, and he brings Cornwallis and 3CU to Long Island. The threat to the Continental Congress and to New York forces Washington to take his army into winter quarters at New York early, to block his advance.

The brits go back to adding PCs in the south, where he is taking a serious lead. His PC in Fredericktown opens up a path into Pennsylvania. So we use our last 1Ops to bring Arnold and single CU into York.

He discards 2 cards, I discard one, and then I use George Rogers Clark to remove the last card (3Ops) from his hand and prevent further bleeding on my part.

Colony Status (B=5, A=8, N=1)
Canada (B)
New Hampshire (A)
Massachussets (B)
Connecticut (A)
Rhode Island (A)
New York (A)
New Jersey (A)
Pennsylvania (A)
Delaware (A)
Maryland (N)
Virginia (B)
North Carolina (B)
South Carolina (B)
Georgia (A)

It could have been a lot worse...

1776

Another pretty poor hand, many Ops, but not many big Ops. I'll probably remain behind in the PC placement race.

The Americans start with Thomas Paine and place PCs in Salem, Augusta, and Springfield, while the Brits move Howe and his 5CU Army into threatening position in Albany. In response, the Americans try to rouse local militias to improve their odds in battle, placing PCs in Westchester, Morristown, and Fort Cumberland.

Burgoyne and 5CUs land in Norfolk, giving the Brits some punch in the South. 2Cus join Arnolds army in York, which may be required to fend off Howe.

Howe continues his move straight towards Philadelphia, intent on disrupting the Continental Congress. Washington intercepts him in Morristown. The battle is relatively even, until Howe brings is artillery to bear and the Continental Army retreats in good order, with minor losses.

2CUs join Washington to bring hisr Army to 4CU. As news of the victory at Morristown reaches hom, North's government announces that it will stay for the long-term (such as 1783).

With Howe in threatening position, the Americans place PCs in Wyoming Valley and Reading to hem him in. At least this will force him to move or be in danger of a crushing defeat. Howe is busy reading dispatches from home, specifically one in which opposition says thay may not be willing to wait until 1783 to bring the war to a conclusion, but maybe until 1782, and misses the threat to his army.

Washington seizes the opportunity and attacks, despite good odds, his Army is not up to the task. Once again, massed artillery drive the Americans back, this time with no losses. At this time, the Brits flip the PC in Morristown.

I now have a dilemma. If he has a campaign card, he has a chance (66%, if Washington misses his intercept roll) of catching Washington in a trap that he can't escape from. I could move washington to safety. But I can also move Greene into Boston and isolate some PCs, gaining a real advantage ion New England. I wonder if he even has a 3Ops card left, since he didn't move Howe out of harm's way.

In the end the odds of him having a campaign card and the odds of a successful intercept convince me to gamble, and I move Green.

Then I lose. He has a campaign card. Washington misses his intercept. Washington misses 3 chances to counter-attack, and finally the battle ends with Washington in British custody and the American war effort in shambles!

Thursday, January 19, 2006

Twilight Struggle (Cold War)

Stephen Crane is helping me playtest the Cyberboard gamebox that I created for the game, and allowing us to give this new game our first spin. Stephen is the USSR and I am the USA. When shown, the number of Influence in parenthesis are the total after placement, not the amount placed.

Stephen places his discretionary Influence in Poland, Hungary, Romania, and Czechoslovakia. I place mine in Italy, W. Germany, Denmark, Benelux, and France.

Turn 1

The USSR's headline event is Decolonization, while the USA playes The Marshall Plan. Stephen is going to jump out to a lead in African and SE Asia, while the USA will lock up much of Western Europe. The US places Influence in W. Germany (3) France (2), Spain (1), Denmark (2), Norway (1), Sweden (1), Italy (3). The USSR places Influence in Sudan (1), Ethiopia (1), Vietnam (1), and Loas (1).

The main feature of the USA hand is an abundence of USSR events, with Korean War the biggest nettle. I'll be looking to shore up Asia to try to soften that blow.

Card 1 - USSR Plays De Gaulle, now France has just 1 USSR Influence in it. The USA plays Red Scare/Purge, so the USSR will have 1 fewer Ops for the rest of the turn.

Card 2 - USSR Plays East European Unrest on the Space Race, but the rocket explodes on the pad. The USA follows suit and plays Suez Crisis on the Space Race, managing to put a satellite into orbit (beep, beep, beep).

Card 3 - USSR plays Nuclear Test Ban for Influence: Yugoslavia (1), Bulgaria (1), Czechoslovakia (2). The USA plays De-Stalinization for Influence: Japan (3), Taiwan (1). USSR uses De-Stalinization to move Influence from Africa to Korea (2).

Card 4 - USSR plays Formosan Revolution with UN Intervention to attempt a coup in Spain, which removes the US Influence there. USA plays Defectors for Influence: Japan (4), Taiwan (2).

Card 5 - USSR plays Fidel and takes control of Cuba. USA decides the time will never be much better, so they play Korean War to attempt a Coup in France. In Korea, there is a -1 for control of Japan. In France the Coup attempt is at -4. The USA manages to prevent a USSR Victory in Japan, but unable to make any political changes in France. DEFCON for the two efforts should now be down to 3, but Stephen and I make a mistake and forget to move DEFCON for the Coup in France, so our DEFCON is 4.

Card 6 - USSR Plays Warsaw Pact Formed to attempt a Coup in S. Korea and succeeds brilliantly. When the dust settles, S Korea has 2 USSR Influence and no USA Influence. The US Plays Vietnam Revolts for Realignment rolls; Vietnam now has 3 USSR Influence. Realignment succeeds in France (+1 USA), which now has no Influence in it. Realignment fails in S Korea (+1 USSR).

Had we got DEFCON right, the USSR would not have been allowed a Coup in S. Korea. Had we got DEFCON and known that DEFCON status also prevents realignment rolls, the USA's last card play would not have happened. So we'll call our rules bluders a wash for this turn.

USA loses a VP for Military Operations.

At Turn's Start:
VP: +1
Space Race: USSR - 0, USA - 1
DEFCON: 4
China Card: USSR

Turn 2

Headline -USSR: Nasser. Egypt now has 2 USSR Influence and no USA Influence. USA: Containment. +1 Ops throughout this turn.

Card 1 - USSR: Arab-Israeli War as Event. No victory for the Pan Arab Coalition despite Israel's current isolation.. USA: Socialist Governments on Space Race. Success for the US who may now play 2 Space race cards per turn.

Card 2 - USSR: The China Card for Influence. Afghanistan (2), Burma (2), Thailand (1) USA: Truman Doctrine for a Coup in Egypt, which brings a pro-US government into power (2 Influence for USA, none for USSR).

Card 3 - USSR: Asia Scoring. The situation in Asia can't get too much worse for me, so Steven decides to score it now. USSR has domination, USA Presence. USSR has 2 Battleground countries (N & S Korea), USA has just Japan. Net 5 point shift for USSR. USA: Blockade on Space Race. The +1 Ops allows me to burn this on the Space Race and we succeed, pulling back 2VPs.

Card 4 - USSR: Olympic Games for Influence: Lebanon (1), Syria (2). USA: Duck and Cover for Influence: Iran (2), Libya (2), Israel (2).

Card 5 - USSR: Independent Reds on the Space Race, but the Russian rocket still fails to get off the ground. USA: MidEast Scoring. USSR has presence, USA has domination. USSR has 0 Battleground countries, USA has 3 (Libya, Eqypt, Iran). Net 4 point shift for USA.

Card 6 - USSR: Indo-Pakistani War as Event. results in a Victory for the Indians, and USSR gets 2VP. USA: Captured Nazi Scientist as Event. We have a huge lead in Space and I don't know if it is wise to press further, but at a minimu, this removes the card so the USSR can't use it themselves to catch up faster.

USA and USSR lose 1 VP for Military Operations.

At Turn's Start:
VP: +1 USA
Space Race: USSR:0 , USA: 4
DEFCON: 4
China Card: USA

Turn 3

Headline - USSR: Comecon. Place Influence: Poland (3), Czechoslovakia (3), Romania (3), Bulgaria (2) USA: MidEast Scoring. It's doubtful the situation will get better than it already is, so let's score it early. USSR has presence, USA has domination. USSR has 0 Battleground countries, USA has 3 (Libya, Eqypt, Iran). Net 4 point shift for USA.

Card 1 - USSR: Europe Scoring. USSR has domination, USA has presence. USSR has 2 Battleground countries (E. Germany, Poland), USA has 1 (Italy). Net 5 point shift for USSR. USA: Suez Crisis as Coup. The Government of Thailand is replaced with a wildly enthusiastic pro-USA government (3). Meanwhile the UK cools on the US (3). Israel and France have no USA Influence, so there is no changes there.

Card 2 - USSR: US/Japan Defense Pact for Influence. Japan is already US-controlled. USSR Influence: Pakistan (2), Iraq (3) USA: Independent Reds as Event. Place 3 USA Influence in Romania.

Card 3 - USSR: Space Race (I lost my notes on which card). But Russian rockets continue to blow up on the pad. They must be running out of Cosmonauts by now. USA: Warsaw Pact Formed on Space Race puts John Glenn into orbit.

Card 4 - USSR: Romanian Abdication as Event. USA Influence in Romania is back to 0. USA: NATO for Influence: Taiwan (3), Phillipines (2), Pakistan (1). The situation in Asia is dire for the USA. Had to spend 2 Ops to remove Pakistan from USSR control and give me a path into India. Besides, it will be a while before DEFCON gets back to a place where coups are allowed in Europe anyway.

Card 5 - USSR: Decolonization. Prepping for next turn's mid-war cards, the USSR places Influence in: Saharan States (1), Nigeria (1), Zaire (1), Angola (1). The situation in Africa is now pretty bad also. USA: Defectors for Influence: India (1), Indonesia (1)

Card 6 - USSR: Five Year Plan as Coup in Iran. The Coup fails, but DEFCON is now 2. Five Year plan forces USSR to discard one of their two remaining cards, and they discard CIA Created. When their last card is revealed, it is Duck and Cover. Had the USSR been forced to discard that one instead, DEFCON would have gone to 1 and the game would have been over! USA: Socialist Governments on the Space Race. The USA takes a space walk and is able to discard Arab-Israeli Wars.

USA and USSR lose 0 VP for Military Operations.

At Turn's Start:
VP: +4 USA
Space Race: USSR:0 USA: 6
DEFCON: 3
China Card: USA

Turn 4

Headline - USSR: Quagmire. The US could be bogged down if things go poorly. USA: John Paul II Elected Pope. Poland has 1 Influence for each country.

Card 1 - USSR: Ask Not... on Space Race, but once again, the rocket blows up. The Soviet futility in space is bordering on the absurd. USA: Muslim Revolution is discarded and the quagmire ends with a roll of 4. I considered holding this card for the Space Race's last box, but it wasn't clear I would make it there and my hand has a lot of USSR events, so I don't want to get forced to play this card.

Card 2 - USSR: Duck and Cover with UN Intervention for Influence: India (3). USA: Puppet Governments as Event. Chile (1), Brazil (1), Panama (1).

Card 3 - USSR: Cultural Revolution for a Coup in Iran. The Coup removes all Influence from the country (-1US), and DEFCON is back to level 2. USA: U2 Incident for Influence: Panama (2), Brazil (2), Iran (1). USSR gets 1VP.

Card 4 - USSR: OPEC for Influence: Iran (2), Poland (2). USA: Allende for a Coup in the Saharan States. USSR now has 2 Influence in Chile. The Coup is wildly successful, and the USA now has 5 Influence.

Card 5 - USSR: Sadat Expels the Soviets for Influence: Poland (3). USA: Truman Doctrine as Event. The Poles are just plain uppity, and now the USSR has 0 Influence.

Card 6 - USSR: OAS Founded for Influence: Poland (1). The US Places Influence in Nicaragua (1) and Colombia (1). USA: Bear Trap for Influence: Algeria (2), Pakistan (2).

Card 7 - USSR: (Out of cards.) USA: Lone Gunman, revealing the last card, South African Unrest, which is promptly discarded. Lone Gunman is used for realignment efforts in Cuba, which are unsuccessful.

USA loses 1 VP for Military Operations.

At Turn's Start:
VP: +2 USA
Space Race: USSR:0 USA: 6
DEFCON: 3
China Card: USA

Turn 5

Headline - USSR: Indo-Pakistani War. Indian Invades Pakistan, but the war does not go as planned and they are rebuffed. USA: ABM Treaty, increases DEFCON 4, but promptly dagrades it to 3 when the US attempts a Coup in Iraq. The coup is less than successful, removing a point of USSR Influence, leaving them with 1 in Iraq.

Card 1 - USSR: Colonial Rearguards on Space Race. The USSR finally puts a satellite in orbit. USA: Voice of America as Event: Cuba (2), N. Korea (2), S. Korea (2), Pakistan (1).

Card 2 - USSR: We Will Bury You as Event. VPs for the USSR and a further degradation of DEFCON, which is now at 2. USA: Asia Scoring. USSR has presence, USA has domination. USSR has 0 Battleground countries, USA has 2 (Japan, Thailand). Net 6 point shift for USA.

Card 3 - USSR: Flower Power for Influence: Chile (4), Argentine (4). USA: Central America Scoring. USSR has no presence, USA has domination. USSR has 0 Battleground countries, USA has 1 (Panama). Net 4 point shift for USA.

Card 4 - USSR: SE Asia Scoring. USSR controls Burma, Cambodia, Vietnam for 3 VPs. USA: Grain Sales to Soviets as Event. USSR hands over Formosan Revolution, which is played as an Event.

Card 5 - USSR: South American Scoring. USSR has presence, USA has presence. USSR has 2 Battleground countries (Chile, Argentina), USA has 1 (Brazil). Net 1 point shift for USSR. USA: Camp David Accords as Event. US Influence in Egypt (4), Israel (2), Jordan (1).

Card 6 - USSR: Blockade as Event. USA discards Brush War. USA: Willy Brandt for Realignment. Removes 2 USSR influence from Cuba (0) and 1 from Nigeria (0).

Card 7 - USSR: Cuban Missle Crisis for Influence: Poland (4) USA: Ussuri River Skirmish as Event. US Influence in Pakistan (3), India (2),

USSR lose 2 VP for Military Operations.

At Turn's Start:
VP: +10 USA
Space Race: USSR: 1 USA: 6
DEFCON: 3
China Card: USA

Turn 6

Headline - USSR: Red Scare/Purge. USA: Junta, placing influence in Peru (2) and attempting an unsuccessful coup in Argentina.

Card 1 - USSR: One Small Step as Event, leapfrogging the USSR to the Lunar Probe space on the Space Track. USA: Arms Race as Event, gaining 3VP for the USA.

Card 2 - USSR: Latin American Death Squads for the Space Race, and the USSR puts a man in space. USA: Alliance for Progress on Space Race, but the USA fails in its attempt to make lunar orbit.

Card 3 - USSR: Liberation Theology as Event to place Influence in Mexico (2) and Guatemala (1). USA: How I Learned to Stop Worrying for Influence: Honduras (2).

Card 4 - USSR: Portuguese Empire Crumbles as Event. Influence in SE African States (2) and Angola (3). USA: SALT Negotiations as Event. DEFCON moves to 4 and the USA reclaims The Voice of America.

Card 5 - USSR: Africa Scoring. USSR has domination, USA has presence. USSR has 2 Battleground countries (Angola, Zaire), USA has 1 (Algeria). Net 4 point shift for USSR. USA: Shuttle Diplomacy on Space Race, and the USA manages a lunar orbit.

Card 6 - USSR: Summit as Event. USSR has two regions (Europe, Africa), USA has 2 (Asia, Middle East). Both sides get the same roll, so the Summit ends rather anti-climactically. USA: The Voice of America as Event. Remove Influence from Mexico (0), Guatemala (0) and India (2).

Card 7 - USSR: Panama Canal Returned for Influence: Bulgaria (3). USA gets Influence in Venezuela (1), Panama (3), and Costa Rica (1). USA: Nixon Plays the China Card as Event, for 2VPs.

USSR loses 2 VP for Military Operations.

At Turn's Start:
VP: +17 USA
Space Race: USSR:4 USA:7
DEFCON: 5
China Card: USA

Note: It wasn't until I typed this up that I realized I forgot all turn long about the Red Scare -1 to USA Ops. An evening fell mid-turn and so by the next day I had forgotten. Looking at this, I only got 2 extra Influence placements, but I got a successful roll on the Space Track that I shouldn't have gotten because the card would only have been 2 Ops, and not enough to even try.

Turn 7

Headline - USSR: Red Scare/Purge. This turn I won't forget! USA: Missile Envy. The USSR passes me the Ask Not What Your Country Can Do For You... card. But I'm happy with my cards, so I decide to keep playing them. Later I realize there was one card I should have discarded (UN Intervention), but somehow I missed that here.

Card 1 - USSR: Missile Envy for Influence: W Germany (3). USA: NATO for Influence: W Germany (4), Denmark (3), France (1).

Card 2 - USSR: Indo-Pakistani War for a Coup in Italy, which reduces USA Influence to 1. USA: Arms Race for Influence: Italy (3). OK, he's got the Europe Scoring card, that's clear. And I'm at -1 Ops to stave off his efforts. If he can lower the number of BG states I control by 1 on his turn and I can't fix it on my turn, he has domination in Europe. Stupid Joe McCarthy's going to make this difficult for me.

Card 3 - USSR: Socialist Governments as Event. Influence removed from France (0) and Italy (1). USA: Olympic Games for Influence: Italy (2). I'm running out of Ops to be able to respond...

Card 4 - USSR: Cuban Missile Crisis for Influence: France (3) USA: Colonial Rearguards as Event. Influence in Zaire (1), Nigeria (1), S Africa (2), Cameroon (1). Well, the French were the last straw. I can't do anything about France since I have no 3Ops cards left that will allow me to place an Influence in France, now that it is USSR controlled. Time to alter the picture in Africa, so I can score that and reduce his benefit from Europe.

Card 5 - USSR: Europe Scoring. USSR has domination, USA has presence. USSR has 3 Battleground countries (Poland, E Germany, France), USA has 1 (Italy). Net 6 point shift for USSR. USA: Africa Scoring. USSR has presence, USA has domination. USSR has 1 Battleground country (Angola), USA has 2 (Algeria, Nigeria). Net 4 point shift for USA.
Card 6 - USSR: Summit for Influence: Iran (2). USA: Brush War for a Coup in Iran, which is wildly successful: USSR (0), USA (3).

Card 7 - USSR: Kitchen Debates for Influence: Zaire (0). USA gets 2VP for having more BG states. USA: UN Intervention. Ops is reduced to 0 so this is a discard. This card should have been discarded during the headline phase, since I had no USSR events to play and it was a 1 Ops card!

USA and USSR lose 1 each VP for Military Operations.

At Turn's Start:
VP: +17 USA
Space Race: USSR:4 USA:7
DEFCON: 4
China Card: USA

Turn 8

Headline - USSR: Aldrich Ames. This turn I won't forget! USA: Central American Scoring. USSR has no presence, USA has domination. USSR has 0 Battleground countries, USA has 1 (Panama). Net 4 point shift for USA, pushing it to +20 for a USA Victory.

Conclusions

So far I like this game. It plays fast, it has interesting strategy considerations, it seems like it can swing back and forth rapidly so you're never quite out of it. Of course, there were some rules problems here that I think affected the outcome, so we'll see after some additional playing how balance seems.

Thursday, January 12, 2006

Empire of the Sun (Stephen Crane, rematch 2)

Stephen and I fire the game up again. This time we're starting from the beginning of turn 1.

Turn 1

The raid on Pearl Harbor goes as expected. All but the US CA are eliminated.

Japanese IAI expansion includes taking Jitra, Singora, Kuala Lumpur, Khota Baru (during which Force Z is damaged but limps home), Hong Kong, Miri, Rabaul, Guadalcanal, Guam. A sizeable force moves into Burma. The most successful effort is in the Phillipines, where Manila falls to a direct amphibious assault, Mindanao falls in an amphibious assault, and the US air forces are wiped out. The Phillipines surrender at turn's end.

The SW Pac HQ reforms at Cairns, ready to avenge the Japanese takeover of the Phillipines.

Turn 2

Stephen continues his onslaught. Tjilitap's air and naval forces are wiped out and the location falls to a direct amphibious assault.

Makin Island Raiders (one of my favorite cards) come ashore at Manila to damage the Japanese's best pre-war air unit.

ISR strikes the Allies. This won't matter much this turn, since I don't have enough forces to actually coordinate anyway. It may be a problem going forward, especially if it lingers into turn 3.

Force Z sorties again to attempt to help the defenders of Kuantan, and once again survives contact with the enemy. The land battle, despite Force Z's survival, goes badly, and the Allied forces are wiped out. Seeing the writing on the wall for Singapore, Force Z relocates to Trincomalee, where it will hopefully fight another day.

Singapore is next. US Navy forces in the area sortie to attempt, once again, to assist the defenders. Once again, the air and naval forces survive contact with the enemy (though the British air is damaged), but it is to no avail and Japanese ground forces overwhelm the Singapore garrison. The British air relocates to Borneo, while the US Navy relocates to Australia. Japanese forces are at the gates of Soerbaja, and little is to be gained from returning there.

With Malaya under Japan's thumb, Allied forces in Burma concentrate in Rangoon, rather than being destroyed piecemeal. This will also force the Japanese to use 2 cards to get to Rangoon. Air units are concentrated nearby, to provide some air cover for any land assault.

The Japanese land at Bangka, taking the resource hex and lining up Palembang for a future effort.

The Brits shuffle troops forward to defend Rangoon against an anticipated assault. The Japanese take Soerbaja unopposed, but meet stiff resistance at Palembang and are repulsed, though losses on both sides are light.

News comes in from oversees of Nazi successes, and discussions about diversion of resources from the Pacific to Europe are intensified. Allied planners, receiving intelligence about a lack of defenses on Enewitok send a token force of Marines to seize the island and airstrip, and begin immediately shipping in reinforcements.

The turn ends with the Japanese in possession of the Phillipines and Malaya, but with most of Borneo and Sumatra left to subjugate in the DEI. The Allies are in possession of Enewitok, and will look to keep that foothold as a springboard for action in future months. They will also concentrate on preventing the Japanese from conquering the DEI, even if it means a last stand in one location.

Unfortunately, Allied planners worries about Europe cause them to divert an Army and an AF unit to Europe, so the Allies will have to do more with less next turn.

Turn 3

Palembang falls immediately, dashing Allied hopes that the garrison there could hold out and force the Japanese to expend more effort than they wanted. But the operation comes at a cost, as Admiral Yamamoto, touring the area, is killed under slightly mysterious circumstances.

A planned invasion of Enewitok goes ahead on schedule, despite Yamamoto's death. The force is detected enroute and met by the entire US Navy. The showdown at sea is a draw, with both sides suffering moderate casualties. But the Japanese withdraw the invasion force, believing themselves to be outnumbered.

With the invasion turned back, the Allies launch a long-range bomber raid against Kwajalein, looking to discourage the somewhat isolated garrison. The bombers dropping leaflets hit their targets, but those with actual bombs do not.

An attempted Japanese landing on Borneo is turned back when Allied cruisers (survivors from the Phillipines) and Allied air units (survivors from Singapore) intervene. Without the promised air and naval supremecy, the Japanese landing force is insufficient to take the location.

With the threat to Borneo now evident, Australian ground and air forces are rushed to defend the island, which should insure the survival of the DEI. ABDA is created and located in Borneo to oversee the operations there, also ending Allied ISR issues.

The Japanese look to eliminate British naval power in Burma with a raid on Ceylon. They are met with rough treatment, however, at the hands of the British naval and air personnel and more irreplaceable Japanese naval assets are lost.

This time around, the news from Europe is favorable to the Allies, and discussions of troop diversions calm down a bit. The Allies also mount a naval operation against the Kusaie and Wotje airfields in the Marshall Islands. Their naval assets are at risk, however if both landings succeed (and the landing at Kusaie can't be opposed, according to Allied intelligence), the Allies can position air units to completely isolate Kwajalein. Deprived any reinforcements or replacements, Kwajalein will be doomed in the upcoming months.

The operation goes even better than planned, when the Japanese are caught unprepared. Not only are the Kusaie and Wotje airfields taken, but the entire defending force on Kwajalein is eliminated. Kwajalein is now empty and isolated, and the Marshall islands can be conquered at the Allies leisure.

Turn 4

Turn 4 starts with another squabble between Allied planners, meaning that ISR is in effect and the Army and Navy will no longer play nice.

The British move forces forward toward Rangoon, which is currently held only by Indian troops. I'd like to keep the Japanese from advancing past Rangoon, if possible, otherwise the fight south is too hard. Eventually the British invest Rangoon, while the Chinese set up a cordon around Hanoi, which may eventually be needed to cut SE asia off from supply. A lone Indian Division is advanced as bait to a position SE of Rangoon, hoping to draw the Japanese into a land battle which the British can react into. Not only can we catch him in a battle at bad odds, but we can also get an extra hex of advance for the British and use our Reaction card.

The Japanese take the bait. Japan's air forces badly maul mine, though I don't much care. The AVG will be replaced later in the turn with the 14AF anyway. Japanese troops perform better in the ground battle, but numerical superiority saves the day for the British.

The Japanese are now left with a single Army blocking the British out of SE Asia, so the British immediately make plans to press onward to eliminate it. Unfortunately, worker strikes in India require British attention, and the planned offensive never comes off.

Turning their attention to Guadalcanal, a massive long-range air bombardment, orginally suggested by Gen. Chennault who is now in command of the 14th AF, is launched against the Naval and Air forces on the island, damaging the available land-based air units.

Marines land on Kwajalein and Ponape, insuring that the Allies will take the Marshalls this turn, and make their progress objectives. Plus they now have a forward base from which to threaten Truk and Rabaul.

The US Navy follows up the AF and attacks Guadalcanal. By the end of the raid, only a single damaged AF unit is left to protect the token land unit. US cruisers are damaged in the raid.

The Japanese reinforce SE Asia, so the once-promising opening for the British has turned into a hard slog.

The Americans, meanwhile, launch a surprise (well, sort of a surprise, because anyone could have seen it coming) invasion of Guadalcanal, combined with a naval raid on Truk. The naval defenders of Truk are decimated by American battleships and carriers, while Guadalcanal falls to the combined efforts of the US cruisers, carriers, and Marines.

With the capture of Guadalcanal, the Americans have the opportunity to make their progress of war requirements in a future turn by taking Rabaul and, with it, the Solomon Island air bases.

Turn 5

The Japanese are down to 4 cards now.

The turn starts with good news from Europe. I held a War in Europe card as my FO to play it during 1943 in order to get an extra box on the track. This brings me back into the Level 1 area of the track. This has been my worst experience of reinforcement diversions so far in EoTS, I'm not anxious for it to continue.

The Japanese ground forces move northward into Burma again. British air and fleet units respond, but the ensuing air-naval struggle is inconclusive. Thr ground combat is a bloody mess for the Brits, and they are forced to retreat, leaving the Japanese at Rangoon's doorstep with a sizeable force.

The shattered British forces retreat into Rangoon itself and brace for an assault which commes immediately. British air units respond, and are decimated in the air combat over Rangoon, although by sheer numbers they take a precious, and irreplaceable, Japanese air unit step with them. Once again, the Japanese get the better of the ground combat, but the Allied numbers and ferocity manage to eliminate the entire Japanese force, leaving Rangoon safe once again, though barely.

With SE Asia devoid of Japanese ground units, the remnant British move forward again.

MacArthur brings an end to Allied ISR, although the cost is a suicide sortie by a US cruiser against the main Japanese naval base in Manila to show the Filipinos that the US has not forgotten them. Accompanying the loss of that cruiser, the Allies launch a major South and Central Pacific operation that takes Rabaul, Saipan, and eliminates the last vestiges of Japanese naval power at Truk. The USS Washington is torpedoed en route and land losses at Rabaul are fairly heavy. Other than that, the operation goes off successfully.

As an added bonus, half the US fleet moves its base of operation forward to Rabaul, and closer to the action. Japanese air units make a raid on Tarakan, and are dealt with roughly by the newly re-based US Navy.

The Japanese reinforce SE Asia, and launch air raids against Rangoon which eliminate the 14th AF.

The Central Pacific HQ is removed from the board so it can be redeployed to the Marshall Islands between turns.

Finally, ANZAC launches a surprise operation, landing the New Zealanders at Soerbaja to re-take the port, and sinking the Zuiho at Tjilitap.

The taking of Rabaul returns the Solomons to US control, making our progress goals. Our forces are a bit "behind the lines" right now, and we'll have to move them forward next turn to get them into the action for the end game.

Turn 6

Not the best cards in the world. I have the Doolittle Raid, which I'll probably use for Ops since I don't think I'll need the extra SW. Two War in Europe cards, but very few of my remaining units are subject to diversion, and none next turn are, so at least one of those will be used for Ops. Two Offensive cards (Lilliput, Axiom), but with their limited Ops value, I need to shuffle forces forward to reach anything of significance. Vinegar Joe Stilwell, but it'll take 2-3 cards for my forces to get from Rangoon to SE Asia to engage in combat. And Halsey replaces Ghormley, which is nice enough, but with the CentPac HQ centrally located, I don't really need Halsey that much, with his limited range.

We'll have to scratch to make PoW this turn, and get our troops forward in anticipation of a more all-out attack starting next turn.

We start by using Doolittle to shuttle air and ground forces forward to New Guinea bases. Japanese submarines, meanwhile, attack the Panama Canal, so my forces are going to be delayed this upcoming turn, even if I move the WIE all the way to "Level 0".

So I use one of those WIE card to take Palau (undefended) and eliminate the last Japanese naval force in Guam. Unfortunately, Japanese submarines (on their way back from Panama, no doubt) sink an American BB. The fleet remnants re-base to Palaua, where we might be able to make use of the 1Ops Offensive cards.

The Japanese abandon Truk, which is almost completely cut-off anyway. Halsey replaces Ghormley. Halsey's first operation involves moving even more air and land forces forward to bases in New Guinea and the Solomons.

ANZAC then launches the Axiom offensive. Australian troops move from Tarakan across the mountains to the outskirts of the undefended Miri. Australian troops are redeployed from Darwn to Toleokbetong, where they threaten both Bangka and Palembang overland. and New Zealanders leave the bars in Soerbaja to reach the outskirts of the undefended Tjilitap. US air units shuttle forward to Singkawang. And an Australian Army lands at the undefended Kuantan, where it is soon joined by a US air unit. This puts Singapore out of supply, locking her naval units in place.

Immediately afterwards, SEAC activates, moving British units towards SE Asia and using the newly-landed Aussies to retake the majority of the Malaya peninsula (3 PoW locations).

The Japanese rebase major air and naval units to Singapore, re-establishing supply and making the Aussies position a bit tenuous. Nothing can be done about that just yet, so the US lands Marines on Ulithi (the 5th PoW location), and re-bases more of its fleet to Palau.

The Japanese deploy their now in-supply forces out of the DEI and into more defensible positions in Malaya and SE Asia. At the same time, the Allies win an important victory in Europe, moving the WIE marker to the "0" space on the track. Hopefully Japan won't want to burn any more of its cards on WIE for the rest of the game, since any single card will have no effect. One more card from the Allies will move the marker to Level "0" and my forces will no longer be delayed.

Japan has 2 cards more than the Allies at turn's end. One is used to extricate the South HQ from Truk. The other is tucked away as an FO.

Turn 7

Turn 7 starts with movement from the British out of Burma into SE Asia. The Japanese themselves are in Bangkok, and the British can only reach the outskirts of the city.

The Japanese fortify their island holdings with a new defensive doctrine, so it'll be hard slogging through their remaining islands defenses.

The US Navy sail out to attack the Japanese naval and air forces based in Manila, but a Monsoon forces them to turn back. News of the attempted operation leaks, and the Japanese disperse their forces, making it harder for the Allies to catch them in one spot.

That failure freshly behind them, the Air Force launches a massive bombardment of Saigon and meets with its own disaster, this one at the hands of the Japanese who tear up the Allied pilots. The Japanese suffer some irreplacebale losses of their own, but at what cost?

The Allies decide it's time to find easier targets. Australian and New Zealand forces, which have been enroute for quite a while, finally march into the undefended cities of Tjilitap, Bangka, and Medan, reducing the Japanese DEI holdings to just the undefended Palembang.

The US Navy re-executes its Manila operation, this time as a surprise attack which includes an extra attack on Japanese forces at Singapore. Two CVs are sunk at Manila, eliminating the Japanese Naval/Air presence there. The Japanese air forces in Leyte are reduced, but unfortunately still around to provide air cover for Manila. And a CV and BB are sunk at Singapore, while the AF is damaged.

After a Christmas break for both sides, the British resume their offensive, attacking Bangkok. But they forget to bring any air cover and are torn up before the battle starts, and do not have enough strength left to take the city. A large tactical blunder by the British commander!

The Allies now have two unopposed cards to play. I'd love to stash Skip Bombing as an FO, if only becauser it will let me draw an extra card in some future turn. But I need both cards to accomplish my last goal for the turn, which is to land forces north of Manila (on a hex that is not within air ZOC from either Leyte or Formosa, and so immune to Special Reaction) to take the airfield, and then eliminate the Leyte air forces so the Manila garrison attrits. I don't want to face the two full-strength units next turn or wait another turn before they attrit.

So, two reaction cards are used, somewhat regretfully, as OCs. But by turn's end, Manila is OOS and the Australians have established a beachhead in the Phillipines. For good measure the former Wake Marine garrison takes Marcus Island, which provides a B29 base and secures PoW goals for this turn.


Turn 8

Turn 8 marks the beginning of 1944, and with it comes a +3 for US Naval/Air in combat, a DRM that I intend to utilize for attrition purposes. With PW at +6 and likely to go to +7 when my B29s bomb Japan next turn, I'm not going to get hung up on PoW goals anymore. I want to clear all possible resource hexes in case Tojo/Manchuria falls the right way, make sure I have some B29 hexes, and look for an opportunity to land in Japan.

Step one is a massive naval strike against Japanese naval/air forces on Mindanao, which are providing some comfort level for the rest of the Phillipine garrison. The Japanese are still sleeping off their New Year's celebration when the US Navy arrives and the entire force (2CVL, CA, AF) is wiped out.

The Japanese begin to feel their SE Asia position is tenuous and pull their forces back nearer to the Home Islands. Submarines locate the Kongo as she moves, but miss with all torpedoes.

Singapore is assaulted in a Joint Forces ABDA operation. US Naval and Air units reduce the defenses, while the Australians take the city itself.

Then another massive Allied operation is unveiled. A US Army lands on Luzon, to join the Australians already ahsore. The US Navy attacks the naval units recently escaped from SE Asia in their new home at Iwo Jima, as well as precious pre-war air units stationed in Tokyo and Nagoya. A pair of CVLs are sunk in the attack against Japan but in exchange for damage to the two irreplaceable air units. At Iwo Jima, a US BB and CV are damaged, but the Japanese lose 2BB and 2 AF, including a pre-war unit.

So far so good in the war of attrition.

Japan continues to pull out of SE Asia, moving ground and air units back to defend the Home Islands. The British obligingly take the newly-empty Udorn, Bangkok, and Phnom Phen.

The Japanese launch their own offensive, returning air units and supply to the Phillipines, and sailing a unit to take the oil fields in New Guinea. The US response is another Air/Naval attack to eliminate the units stationed in the Phillipines. Japanese air units respond to the attack, but all 5 air units are wiped out with no losses to the US. After the battle, one of the participating US air units is re-based to Biak, cutting the Japanese landing forces off from supply, and insuring that they will simply attrit out of existence.

Handwriting on the wall, the Japanese abandon Mindanao. Unwilling to let further Japanese ground units escape, the Allies take Manila, although losses are very high.

British units take the empty cities of Cam Ranh and Palembang to complete US PoW goals. I know I wasn't going to be focused on this, but there was nothing better to accomplish without undue risk. US Political Will will probably be +7, meaning that PoW can probably be safely ignored for the rest of the game, which will be necessary as I plan for an invasion of Japan.

Turn 9

B29s bomb Japan successfully, in fact so successfully that it creates a firestorm, both literal and figurative. The literal firestorm costs the Japanese a card, while the figurative firestorm within Allied High Command means that the various branches will not cooperate. With no anti-ISR cards in hand, I begin to wonder if I can actually accomplish my goal of landing at Onimato (which is undefended except for the intrinsic garrison) this turn.

First things first. Leyte still has sizeable Japanese Army units, so the US Navy eliminates their protective air cover, locking them in place. I don't need Leyte, but I don't want those units going home. At the same time, the former Wake garrison lands on Mindanao, seizing the port and airfield.

The Japanese mount an operation to evacuate the Guam garrison back to the Home Islands. The commander of US Naval forces in Saipan is, to say the least, embarassed when the evacuation is noticed.

The US Navy launches a raid against Tainan and are caught by both Kamikazes and an aggressive Japanese reaction. 1 US CV is sunk, 1 is damaged, and 2 BB are damaged. In return, the US manages to eliminate a Japanese pre-war AF, damage another, and damage a CV. Unfortunately, a reacting Japanese air unit rebases to Leyte and allows the garrison there to escape back to Japan.

When the US fleet limps back to Manila, the dockworkers make heroic efforts, repairing the fleet and making it operational again.

The British fleet, which has spent much of the war sunning itself on Ceylon, rebases to Mindanoa while the British Army goes to Cam Ranh from which it can SR to a better location, possibly allowing it to participate in the invasion of Japan and avoiding PW penalties for US losses.

Still eyeing a possible invasion of Onimato, the US Navy attacks Tokyo and Nagoya, taking them by surprise, and destroying a BB and 4AF units. It also takes Onimato out of any Air ZOC, making an invaion a bit easier.

After much vigorous debate, the decision is taken to send 3 Marine Corps into Onimato with US Naval support. The amphibious assault catches Japan by surprise, and the local garrison is unable to repel the Marines, although they do suffer heavy losses.


The US Navy immediately occupies the ports, with the CVs providing enough air cover to insure supply for the Marines. Replacements are rushed to the Marines bringing them back up to full strength, and newly launched ships are hastily sailed to Onimato, reinforcing the naval forces already there.

Turn 10

The B29s continue their pounding of Japan and the Marines prepare for action.

Meanwhile, the presence of Marines on Japanese soil leads to a round of finger-pointing at Japanese HQ, hampering their military efforts. More units are recalled to Japan from Formosa, Tainan, and Shanghai.

Japanese Air and Naval forces are nearly gone. They have damaged AF units on Formosa and Tainan. A damaged CV and an AF unit on Okinawa, a CV and an AF unit in Osaka, and a single AF unit in Sasebo. So the US Navy, still unable to mount join operations with the Army, visits each location with the goal of wiping out all vestiges of Japanese naval and air power.


The US incurs heavy losses: 1CVL damaged, 1CV sunk, 2CV damaged. But when the dust settles, the Japanese have just a single damaged AF unit left on Formosa with which to defend herself.

That unit is subsequently destroyed in an operation that sees the ground forces defending Tokyo reduced by bombardment and Marines entering Tokyo.

At this point, Stephen conceded. With 2-1/2 turns left, it seems impossible to believe that the conquest of Japan can be forestalled.

Conclusion

The dynamics of EoTS continue to reveal themselves to me in interesting ways and I remain impressed with the game. I am of the opinion that they key to the game is maintaining interlocking Air ZOCs and most operations are geared towards that effort, which seems highly realistic.

Stephen continues to get bad luck when it matters most and that is making a big difference in our games, in my opinion. He seems to give the US bloody noses when they arrive with overwhelming force and can afford it, but miss interception rolls when he could force an even battle.